Alzheimer’s Disease MRI Research
A Google Colab MRI classification study that keeps image inspection, preprocessing, staged labels, CNN training, and comparison visible in the notebook record.
Medical imaging experiments can become difficult to judge when the final score is separated from the images, preprocessing choices, label structure, and evaluation path.
The notebook keeps the study sequence visible: MRI inspection, image resizing, augmentation, four-class labeling, CNN training, and ensemble-oriented comparison.
A repository-backed Colab notebook and supporting image outputs that show the experiment as a reproducible sequence rather than a polished clinical claim.
Role: I built the data preparation, augmentation, training, and evaluation flow and preserved the notebook as the visible record of the experiment.
A medical imaging study preserved as an experimental record
The work stays close to its actual experimental form: a notebook-driven MRI classification study in Google Colab that moves from image inspection and preprocessing to model training and comparison.
The notebook is treated as the primary record of the work because it preserves the order of decisions, not only the final result.
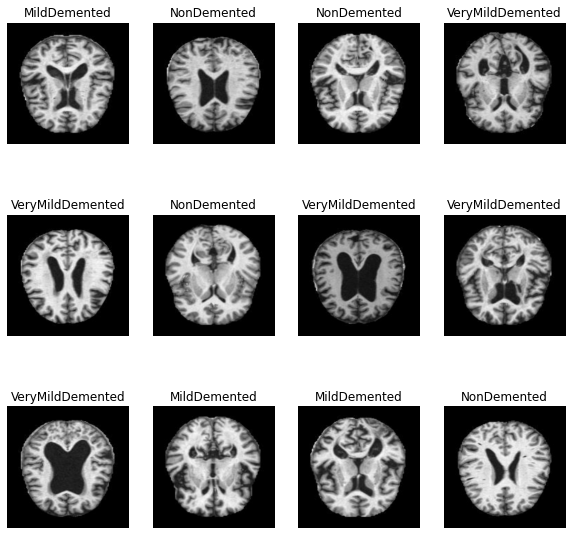
Representative MRI slices keep the data visible
The notebook includes direct visual inspection of MRI inputs. Keeping examples like these in the workflow matters because it ties preprocessing and model design back to the actual structure of the data rather than treating the dataset as an abstraction.
MRI sample montage extracted from the notebook output in the repository.
The classification problem is staged, not simply binary
The classification target is more demanding than a simple healthy-versus-disease split.
The study uses four classes: NonDemented, VeryMildDemented, MildDemented, and ModerateDemented. That framing matters because the model is not only asked to separate apparent disease from no disease. It is asked to distinguish degrees of progression that can be visually close and unevenly represented.
The notebook reflects that framing at each stage. Data preparation, augmentation, and evaluation sit inside a multi-class setup, and the later ensemble work only makes sense because a visible baseline has already been established. The value of the project is not a claim of clinical readiness. It is the preserved experimental sequence: what data was used, how images were prepared, how the model was trained, and how later comparison entered the workflow.
Key experimental choices
Notebook-first work retains useful forms of visibility
In this study, inspectability is part of the value rather than a sign of incompleteness.
Images remain visible
Representative MRI slices stay inside the experimental record, which keeps preprocessing and modeling grounded in the data itself.
Pipeline decisions stay local
Loading paths, resizing, augmentation, training, and evaluation appear in one continuous environment instead of being scattered across scripts.
Comparisons can be read in sequence
Later ensemble or comparison logic is easier to judge when it appears as an extension of earlier notebook steps rather than as an isolated result.
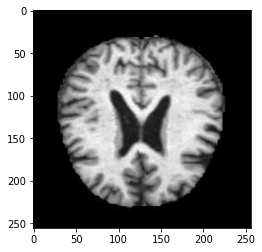
Single-slice inspection helps keep the pipeline concrete
Notebook-based work is often criticized for being less polished than packaged code, but it has one important advantage: the data remains visible. Images like this make preprocessing decisions easier to inspect and discuss.
Single MRI slice extracted from the repository notebook output.
The notebook is the record of the study
Its value lies in preserving sequence and decision-making, not in pretending the work happened somewhere else.
In this project, the notebook is not treated as an intermediate artifact waiting to become a cleaner library. It is the most faithful representation of the work. It shows where the dataset is loaded, how the images are augmented, how the convolutional model is trained, and how later comparison logic is layered in.
That visibility is important in medical and scientific contexts. The useful question is not whether a result looks good in isolation, but whether the sequence of choices behind it can be examined with enough detail to judge the work responsibly.
How the study progresses
The notebook format makes each stage legible in order rather than compressing everything into a final result.
Load and inspect MRI inputs
The first step is not training but looking at the images closely enough to understand what the data actually contains.
Prepare and augment the dataset
Resizing, partitioning, and augmentation decisions are made in the open, with the implications visible alongside the code.
Train the baseline CNN
The core convolutional model establishes the initial performance frame for the classification task.
Extend into comparison and ensemble logic
Later evaluation becomes meaningful because it grows directly out of the earlier pipeline rather than replacing it.
The project is best understood as a visible sequence of experiments
The later portions of the notebook move beyond a single model result and into comparison. That transition is where the study becomes more interesting, because it reveals how performance was interrogated rather than simply reported.
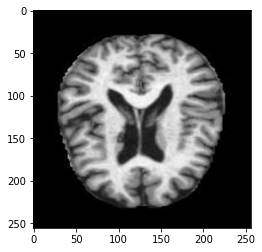
Additional MRI output extracted from the notebook record.
What this study demonstrates
The contribution is methodological transparency rather than a claim of production or clinical readiness.
This work demonstrates a practical medical imaging workflow built under notebook-first conditions: dataset preparation, convolutional modeling, staged classification, and comparison-oriented evaluation in a single reproducible file. It is not presented as a clinical system or a polished deployment target. Its value lies in the transparency of the experimental process and in the way it captures model development in a form that can still be reviewed, rerun, and extended.
README appendix
The curated project page above is the main reading path. The imported README is kept as source context for readers who want to compare the portfolio narrative with the repository record.
Open imported README
Alzheimer's Disease Detection with Ensemble Learning

This repository contains a Google Colab notebook for classifying Alzheimer's disease progression from brain MRI images using convolutional neural networks and ensemble learning experiments.
The project focuses on four diagnostic categories derived from Clinical Dementia Rating style staging:
NonDementedVeryMildDementedMildDementedModerateDemented
Project Overview
The notebook builds an end-to-end image classification workflow:
- load MRI image data from Google Drive
- create a TensorFlow dataset pipeline
- split the data into training, validation, and test sets
- apply resizing, rescaling, and augmentation
- train a CNN classifier
- evaluate predictions on held-out samples
- compare single-model results with ensemble variants built from saved models
The notebook is exploratory and notebook-first. It is best read as an experimentation workflow rather than a packaged training library.
Notebook Contents
The main notebook is AZclassification5(wide).ipynb.
It includes:
- background notes on why early Alzheimer's detection matters
- dataset framing for the four MRI classes
- TensorFlow/Keras preprocessing and augmentation
- a baseline sequential CNN model
- sample prediction visualizations
- loading previously saved models from Google Drive
- simple averaging ensembles across multiple trained models
- an initial weighted-ensemble section
Model Pipeline
Baseline CNN
The baseline model in the notebook uses:
- input resizing to
256 x 256 - pixel rescaling to
[0, 1] - data augmentation with flips, rotations, zoom, width shifts, and height shifts
- stacked
Conv2D + MaxPooling2Dblocks - dropout before the dense classifier head
- a final softmax layer over 4 classes
Dataset Split
The TensorFlow pipeline partitions the dataset into:
80%training10%validation10%test
Ensemble Experiments
Later sections of the notebook load additional saved models from Google Drive and test:
- a 2-model averaging ensemble
- a 3-model averaging ensemble
- a draft weighted-ensemble experiment
Tech Stack
- Python 3
- TensorFlow / Keras
- NumPy
- OpenCV
- Matplotlib
- PIL
- Google Colab
The notebook also installs and references:
opencv-pythonkeras_sequential_asciivisualkeras
How To Run
Option 1: Run in Google Colab
Open the notebook with the badge above, then:
- mount Google Drive
- upload or link your MRI dataset in Drive
- update the hardcoded dataset path in the notebook if needed
- run the cells in order
Option 2: Run Locally
You can also run the notebook locally in Jupyter, but you will need to replace the Colab-specific parts:
- remove or adapt
google.colab.drive - update the dataset path from the current Google Drive location
- ensure TensorFlow and the imaging dependencies are installed locally
Example package install:
pip install tensorflow opencv-python matplotlib pillow numpy visualkeras keras-sequential-ascii
Data Assumptions
The committed notebook expects a dataset path like:
data_dir = r"/content/drive/MyDrive/datasetzip/dataset/photos"
The dataset itself is not included in this repository, so you will need to provide your own MRI image folder structure before running the notebook.
Repository Structure
.
├── AZclassification5(wide).ipynb
└── README.md